FotoWeb offers two modes of file upload:
1) If basic file upload has been enabled for your user account, you will be given access to upload files by logging in to FotoWeb and accessing Upload as described further down in this topic.
2) If you have been given access to the FotoWeb Desktop module, you will be given the opportunity to upload files from your desktop directly to a FotoWeb archive. To learn more about the added benefits of the FotoWeb Desktop Uploader, please read Uploading files using FotoWeb Desktop
Before you proceed: If your site has Single Sign on (SSO) enabled and you use another browser than Internet Explorer, uploading files in the way described below may fail. That's because only Internet Explorer supports transfer of your user credentials to the upload plugin. Hence, if you use another browser than Internet Explorer, you may want to use FotoWeb Desktop to upload your pictures instead.
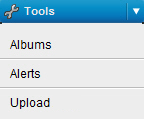
If the system administrator has given your user account permission to upload files to the system, you can do so by opening the Tools menu and choosing Upload, as shown below:
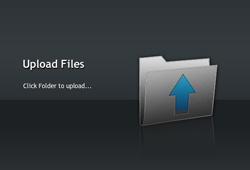
When you're in the upload area, click on the Click to Upload button in the top left corner (above the Actions panel) to open the upload module:
![]()
The upload module opens in a pop-up window- Clicking on the large folder opens a regular Open File dialog that lets you select a number of files to upload - you're not limited to uploading one file at a time.
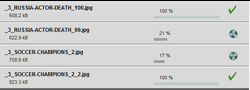
The upload then starts and indicates the upload progress:
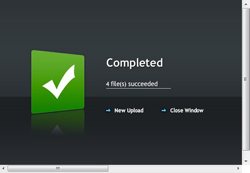
Finally, when the upload completes you get a status screen that tells you if all the transfers were successful. If some of the files failed you will get the possibility to try and re-send only those files.
After the upload completes, depending on how FotoWeb has been configured you may now be able to open the archive containing your uploaded files and continue working with them there.